

Passes are digital representations of information that might previously be on paper or plastic. We can use the Wallet app now to keep rewards cards, coupons, boarding passes, movie and event tickets, and more in one convenient place for easy access. So this blog helps you set up your environment for pass development and sign one of the sample passes.
In order to build the first pass the following three steps should be followed:
- Creating and Populating the Pass Package
- Setting the Pass Type Identifier and Team ID
- Signing and Compressing the Pass
1. Creating and Populating the Pass Package
Passes are created as a package containing a pass.json file that defines the pass, and image assets such as the logo and the icon. The pass.json contains the following:
{
 	 "formatVersion": 1,
  	"passTypeIdentifier": “PASS_TYPE_IDENTIFIER”,
  	"serialNumber": “Unique number”,
  	"teamIdentifier": TEAM_IDENTIFIER,
 "barcode": { "message": ";123456", "format": "PKBarcodeFormatQR",  "messageEncoding": "iso-8859-1" },
  	"organizationName": "ORGANIZATION NAME",
  	"description": "EXAMPLE TITLE",
  	"logoText": "ORGANIZATION NAME",
  	"foregroundColor": "#FFFFFF",
  	"backgroundColor": "#183139",
  	"labelColor": "#FFFFFF",
  	"storeCard": {
    	   "primaryFields": [
      	         	{ "key": "name", "label": "NAME", "value": “SUDIP PAUDEL” },
    	    ],
    	   "auxiliaryFields": [
      	         	{ "key": "member_no", "label": "Member no.", "value": “123456" },
      	         	{ "key": "Club", "label": "Club Name", "value": "THE CLUB NAME" },
      	         	{ "key": "", "label": "", "value": "" },
    	   ]
   	}
	}
StoreCard-JSON
To create the pass package for our pass, we need to perform the following steps:
a. Make a new directory in the Documents folder called StoreCard.pass(example pass).
b. Download this book’s companion file (from the developer downloads area), and locate the coupon in the Sample Passes directory.
c. Open the raw pass package, and copy the files it contains to StoreCard.pass directory.
2. Setting the Pass Type Identifier and Team ID
Every pass has a pass type identifier associated with a developer account. Pass type identifiers are managed in Member Center by a team admin. To build the pass, we need to request and configure a pass type identifier.
To register a pass type identifier, we need to follow these steps:
a. In Certificates, Identifiers & Profiles, select Identifiers.
b. Under Identifiers, select Pass Type IDs.
c. Click the plus (+) button.
d. Enter the description and pass type identifier, and click Submit.
Now we can edit the pass.json file, and change the pass type identifier and Team ID. To find Team ID, need to perform the following steps:
- Open Keychain Access, and select your certificate.
- Select File > Get Info, and find the Organisational Unit section under Details. This is our Team ID.
3. Signing and Compressing the Pass
To download your pass signing certificate the following steps should be followed:
a. In Certificates, Identifiers & Profiles, select Identifiers.
b. Under Identifiers, select Pass Type IDs.
c. Select the pass type identifier, then click Edit.
d. If there is a certificate listed under Production Certificates, click the Download button next to it. If there are no certificates listed, click the “Create Certificate” button, then follow the instructions to create a pass signing certificate.
To get the signpass tool, we need to perform the following steps:
- Download this book’s companion file (from the developer downloads area), and locate the signpass project.
- Open the project in Xcode, and build it.
- Right-click on the signpass executable (in the Products folder in Xcode) and select Show in Finder.
-
Move the signpass executable to the Documents folder. To sign and compress the pass, use the signpass tool to sign the pass package. In Terminal, we need to run the following commands:
cd ~/Documents
./signpass -p StoreCard.pass
These commands create a signed and compressed pass named StoreCard.pkpass in the Documents folder. Now this file is ready to upload to Wallet. In order to have correct details, we need to enter the correct details in the pass.json.
Viewing the Pass.
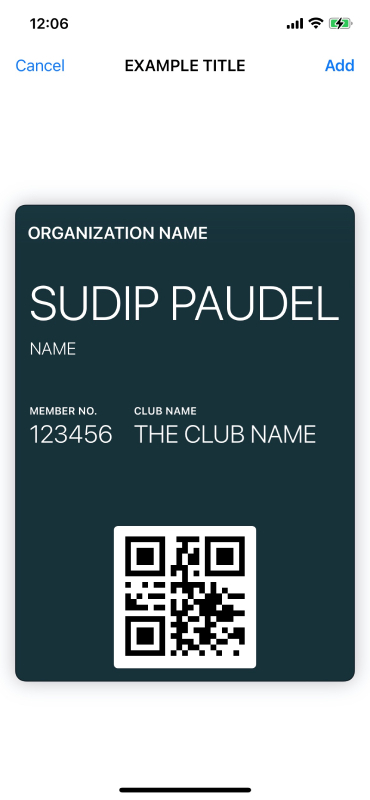
The simplest way to see what a pass looks like during development is in the iOS Simulator app. To view the pass, we need to launch the Simulator and drag the StoreCard.pkpass file into the Simulator window. It displays the pass and offers to add it to the Wallet. The below screenshot shows the pass that is ready to add to wallet and this pass is created from the above pass.json(StoreCard-JSON) file.
You May Also Like
Updating a pass in Apple Wallet
Ps. if you have any questions
Ask here